Saturday, November 21, 2009

I often drive by this path cut through some pine trees that I've always wanted to stop and try to capture. I got up early today and arrived just as the sun was starting to come up - with an extra large coffee to keep me warm. Since it was quite dark, a long exposure was necessary and a tripod a must. I also used a bubble level that slides into the hot shoe to ensure that the camera was level (a very useful tool when you have a horizon to worry about).

When I was walking to this spot, I came upon two grouse that didn't stick around to watch me take pictures. There were also several different groups of Canada Geese that flew overhead while I was there, honking their way south for the winter. The one thing I love about nature photography is the nature!

I took two main images of the location. A landscape (horizontal) with the path centred in the frame to give a tunnel effect of the trees lining the path and a portrait (vertical). For the portrait, I wanted to have something in the foreground and settled for mushrooms that were at the side of the trail.

Here is the landscape version:


17-40mm lens @ 40mm, f22, 120 seconds, ISO 100

And here is the portrait:


17-40mm lens @ 17mm, f22, 90 seconds, ISO 100

Finally, a closeup of the mushrooms in the portrait image.


70-200mm @ 155mm, f22, 45 seconds
Enjoy!
Rob

Friday, October 30, 2009

Point Clark Lighthouse Turns 150

I was in Point Clark this past August. It was celebrating the 150th anniversary of the lighthouse located on the shore of Lake Huron. It was finished in 1859 and took two years to build. The lighthouse is 87 feet tall and is made of limestone. The light was lit for the first time on April 1st, 1859. The Point Clark lighthouse is one of six lighthouses on Lake Huron and Georgian Bay. They are known as the Imperial Towers.


17-40mm @ 17mm, f16, ISO 100


Here is a closeup of the one window that appears to be about 2/3 up the tower.


100-400mm @ 235mm, f11, ISO 100


A closeup of the top of the tower (slight crop to remove dead space).


100-400mm @ 115mm, f11, ISO 100


And finally, a late evening shot.


17-40mm @ 17mm, f22, ISO 100


Cheers,
Rob


Tuesday, September 15, 2009

Hi everyone, it's been awhile! I apologize for the delay in posts, but now I'm back.

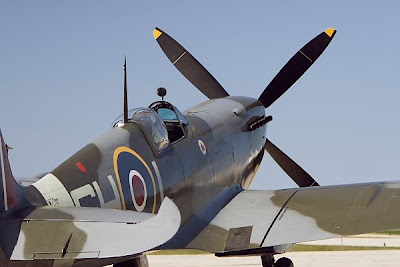
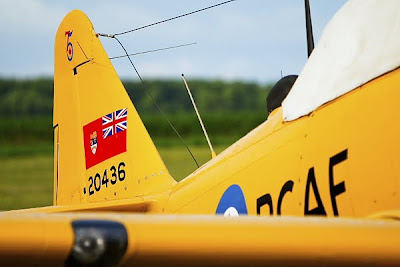
I went to the ABC Gathering in Kincardine, Ontario this year. Great show, it includes Airplanes, Bikes, and Cars (hence ABC). This year they had a Supermarine Spitfire Mark IX, North American B25-J Mitchell, North American Harvard, Sopwith Strutter, and a Fokker DR.1 for the airplanes. The bikes (motorcycles) and cars are put on display by various attendees. I heard that one couple drove their bikes all the way from British Columbia to attend! Pretty amazing.

I've included several shots below which is but a small sample of what I actually took that day. It was a beautiful day with early morning clouds and then blue sky for the rest of the day. Ducati was also in attendance with a sample of their motorcycle line. And there were a couple of pilots from WWII that spoke to the crowd.

Here is a nose shot of the B25 Mitchell. This was my favourite image of this plane showing the intimate details of the front guns.


The Spitfire was really cool. And I loved the Mickey Mouse detail on the side. The one pilot that spoke flew the Spitfire in WWII. I also met someone I knew at the show and found out during the discussion that he was a mechanic in WWII and he had a picture of himself on a Spitfire from the war. He had an opportunity to talk to the pilot and share some stories.


The next two planes were from WWI, the Sopwith Camel and the Fokker DR 1. Due to weather delays, they ended up flying in around noon so the crowd got to see them fly in.


The next images are of the Harvard.


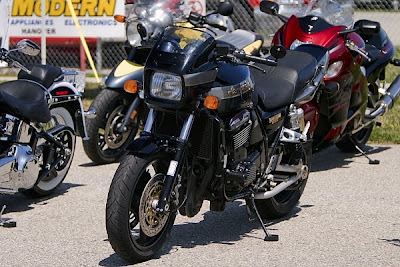
Finally, a couple of images of the cars and bikes. If you note in the bike picture, there are what looks to be hockey pucks under the kickstands. Well, they are! One of the organizers, a guy I know well, sells these modified pucks. You can check them out and order them at http://www.parkingpuck.com/. Pretty cool idea....


Cheers!
Rob

Friday, July 24, 2009

Comments and Suggestions

For those that are wondering about leaving comments or messages, there are a few ways to do this. At the end of each blog entry is a Comments link. If you click this link, it will take you to a message area where you can leave me a message for that particular post (you don't have to be a member, you can use anonymous).

Or you can click on my profile on the right side and then on my email link at the left side of my profile screen and send me an email.

Or you can click on my website link and use the Contact Me link to send me an email.

I am open to any suggestions for upcoming blogs - tips, techniques, etc. I'd love to hear any feedback to make improvements to my website or my blog (maybe a guest book?) or just let me know you were here.

I couldn't put a post without adding some images. See below for a couple images of a lighthouse silhouette at sunset taken a few nights ago. I took a few mosquito bites that evening!

Cheers,

Rob


Wednesday, July 1, 2009

Macro Magic

Today had great conditions for some macro photography with the exception of a little breeze. Patience is important to wait for a lull in the breeze before firing off some frames. It was Canada Day today and I had the day off, so I grabbed the camera and went out this morning for a couple of hours. It rained last night and everything was still wet.

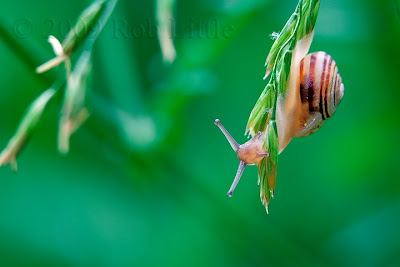
All images were taken with a 70-200mm/f2.8 with a 25mm extension tube and 1.4x teleconverter. A tripod is also highly recommended (used in all images) due to the shallow depth of field and also since any movement is extremely exaggerated. I also used a remote shutter release to minimize any movement during shutter release.

The first subjects I came across were some snails. They were everywhere! Here are three of the images.


I also took a couple flower images of a Daisy (including a friend in the first three following images) and one (last of three) of a Bird's Foot Trefoil (Lotus Corniculatius).


And finally, as I was heading back to the car, I noticed a bee sitting under a leaf. It appears it was drying off or still in hiding from the rain. I took an image from a bit of a distance (first of two) before getting in tight in case it flew away. For the last image below, I was probably about 6-8 inches from the bee.


Cheers,
Rob


Friday, June 26, 2009

Lake Huron Sunsets

We had some interesting cloud structure this week and I drove down to the lake to try capture the sunset. The sun had already disappeared when I arrived and I only had about 45 minutes of light left so I had to setup quick.

A couple things to note for these images. Long shutter time is essential to getting a good exposure low light. Long shutter time = tripod, no exceptions. It is also important to know your camera and tripod well to quickly change compositions and camera settings. Bring a flashlight to help you see.

The first image was taken around 9:30pm. I wanted to frame along the waters edge and chose this location to put the large rock in the foreground to add some interest. I wasn't paying total attention to my surroundings and almost ended up with a soaker - almost!

17-40mm at 29mm, f22 @ 20 seconds

The second image is around 15 minutes later, approximately 9:45pm. Again composed with a large rock in the foreground and the shoreline at an angle. For this image, I used my flash to fill in the foreground to maintain detail. I hand held the flash and just manual fired it about 5 or 6 times at different spots around the rocks. Notice I framed this vertically. Remember what I said earlier, know your camera and tripod well - it minimizes the fumbling around and lets you focus on the composition and details. Also notice the exposure time - 17 additional seconds longer to compensate for less light.


17-40mm at 17mm, f22 @ 37 seconds

Finally, this last image was taken at 10:01pm. There was not much colour left in the sunset but the blues in the sky are now deep. One thing to note here is that I am shooting approximately an hour after sunset, it is now pretty dark but this can make a dramatic image. Worth sticking around for, don't you think? Often people take a few shots when the sun is still in the sky and then put the camera away once it starts to disappear. Something to think about.
17-40mm at 17mm, f22 @ 95 seconds
Cheers,
Rob

Canadian Geographic POTW

Well I have to pat myself on my back in this post. This image was chosen for Photo of the Week (POTW) on the Canadian Geographic Photoclub website.


You can see it and the other POTWs at the following link:


I had borrowed a 100mm macro lens from a good friend and testing it out. I came out on my deck looking for various and assorted insects and this fly was sitting on the railing of our deck.


I handheld the camera with the lens resting on the railing for stability. I went to minimum focus distance and rocked back and forth to fine tune the focus. One of my first images with this lens so I guess I got pretty lucky.


And I was happy that it stayed around for a few frames before flying off.


Cheers,


Rob

Sunday, June 14, 2009

There are lots of new Canada Geese families in this area and the goslings are growing fast. There are several families that reside near where I work and I brought my camera with me to take a few shots last week. Here are a couple of images from that day. The adults were keeping a close eye on me and the little guys were busy pecking away at the grass. The one little one in the second image below was in deep grass and near the top of a little hill so that just it's head and neck were showing above the grass.


Friday, June 5, 2009

Country Roads

Here are some images from this past week as I was driving to an appointment. I had my camera with me and it was a cloudy (and rainy) day so the light was not too harsh considering it was mid-day. I travel through a lot of country roads and there are ample opportunites for pictures. I had to shoot in tight to keep the grey sky out of the pictures.

This driveway caught my eye as I passed by going to my appointment. I stopped on my way back. It was raining at the time so I had to stay in the car and shoot hand held resting the lens hood on the partially rolled down window for stability.


This young bull was laying in the grass but facing away from me. I could not get a good image until he stood up and seemed to stand there posing.


This next image is cropped to remove an annoying fence post that was covering the black cow at the back end.


The next two images were taken from a hill overlooking a field in a valley. Quite beautiful actually. The vertical shot is zoomed in tighter (195mm) than the horizontal (125mm).


Friday, May 29, 2009

Storm Front

It has been raining on and off the last few days (see clouds in previous post!). The clouds looked a little ominous today and I stopped near the lake to try a couple of images. I took a few horizontal and vertical images before the rain hit. I just got my equipment in the car when it started to pour. There's something about water and my camera lately that is starting to concern me!

Let me know what your preference is (i.e. horizontal vs vertical). I think I'm partial to the vertical.

FYI - I used a 2-stop ND grad for this image, on a tripod, remote shutter release, polarizer, and mirror lock-up.

I also find it interesting (and I didn't know this when I was taking the pictures) how the water disappeared from the vertical image. Maybe the wind changed directions and I didn't notice. They were only taken minutes apart.


Sunday, May 24, 2009

Oops - almost!

I had some time on Saturday afternoon to get in some pictures and decided to go in search of a location. It was overcast and not ideal but I always go out and just take pictures even if it's to try some new things. I stopped near the Saugeen River and found a location I had always wanted to check out.

Well, I got a few pics in and it was awkward in places on the rocks and I had the tripod legs not even on one of the last images to try find a good camera position. I had set my backpack down to take the shots (see below, it's the vertical with the large rock in the foreground). After I took this one, I planned to head up to take the fence shot that I included below as well. I straightened the legs of the tripod and forgot I had to pick up my backpack so I spread the legs out to stand it back up while I got the backpack.

Here's a hint for using a tripod in the field - ensure it is balanced and stable when you place it down, especially when you are turning your back! I did not do that this time and I had bent down to pick up the backpack and as I was standing back up, out of the corner of my eye, I see my tripod falling over with the camera body and lens heading straight into the water.

Knowing the backpack had padding and the equipment inside was protected (at least I hoped it was!) I dropped the backpack on the rocks and desperately reached for the tripod. This was one of those times when you play it back in your head it seems like it happened in slow motion. I caught the closest leg and almost dropped myself in the water but saved the camera about a foot above the river - the only thing that got wet was the shoulder strap. It was like falling down with a glass of beer in your hand and not spilling a drop - not that I haven't done that before (too many times anyways!).

Speaking of beer, I had a couple when I got home to calm the nerves. If that camera hit the water, I would have been out of commission for awhile. I guess I found out that I still have some reflexes! I don't want to test them this way very often though. Anyways, here are a couple of images from that afternoon.

Cheers,

Rob


Thursday, May 21, 2009

As I mentioned in my heading, I am an avid nature and landscape photographer. Since I "got serious" into digital photography, I have been practicing many different techniques to try to understand how the pros get such great images. I enjoy bird photography and have always wanted to be able to be successful with bird images. One thing I found out very quickly is that they are very hard to capture full frame - my initial attempts had the bird looking like a small spec in the image.

In this post, I want to focus on birds in flight - a difficult feat - at least when I try! I have attempted over the last couple of years to figure this one out. After many unsuccessful images (and I do mean many) and a few successful ones, here is what I found has helped to increase my shooting percentage.

A fast shutter speed is needed to freeze a subject in flight. A mistake I made early on was to try shoot at a mid-aperture under the assumption that I needed a large depth of field (I will get into apertures and depth of field discussions in a later post). I would try f11 in hopes to maximize my chance of a in-focus image. However, this actually worked against me since I suffered in shutter speed. My blurry images weren't a result of my inability to focus on a moving subject, but because my shutter speed wasn't fast enough to compensate for the camera motion and subject motion.

A larger aperture (f2.8 - f5.6) can help maximize the resulting shutter speed. Basically, it allows more light to hit the sensor (film) allowing a faster shutter speed. Ever since I realized this, my images have become more successful. A large aperture also helps to give a nice blur in the background to help the subject stand out.

An additional setting to help with gains in shutter speed is increasing your ISO. One thing that you have to be aware of in digital photography is that higher ISO's can cause more noise in the image. Some of the newer cameras are better at minimizing noise giving the photographer the ability of shooting at higher ISO without a great loss in quality. I tend to not go above ISO 400 with my current setup and have come away with some successful images. Although if the image is slightly under exposed and you need to brighten the image in post-processing, the noise becomes noticeable.

Focusing can be an issue with a moving subject as well. I use AI Servo AF (Canon) which allows the camera to track a subject that approaches or retreats form the camera at a constant rate and then predicts the distance from camera to subject just before the image is taken.

Finally, since you can expect to throw away a lot of images because of wing position, lighting, lack of focus, etc. I shoot in burst mode to maximize my chance of a "keeper". You end up with a lot of images, but you also increase your odds of being successful.

Well, I hope these tips make sense and help you become a better in-flight bird photographer. I have posted a few images here - yes they're only ring-billed gulls, but they are good examples of these techniques. They are also a great subject to practice on because they are readily available. All I have to do is go to the beach!


Cheers - Rob


Wednesday, May 20, 2009

Welcome to Rob Little's Photo Blog

Well, this is my first post. In this blog, I plan to share photos from various outings and include techniques that I used in the field in hopes to help you become a better photographer. You can also visit my website (http://www.roblittlephoto.ca/) to see more images as well so please take some time and visit there too. In my blog, I will try to include both recent experiences as well as from the past few years to describe a certain experience, technique or theme. Hopefully you will find this blog both interesting and educational at the same time. Feedback is always welcome, so please leave a comment or send me an email at roblittlephoto@roblittlephoto.ca. Enjoy!

Cheers,

Rob